
It’s been a busy couple of weeks in and out of the workshop recently. A lot of work has been for a long term job I’m doing in collaboration with Thomas Philpott Cabinet Makers (the guys downstairs in the workshop) for a client who is completely remodelling their home with some very interesting and ornate features.
One recent set of components that were required for this was a set of panels to go on the underside of an arched doorway. We scratched our heads a bit about how to do these but in the end went for bending sheets of 3mm MDF into a curved glued form and machining the beaded, raised panel shape into these to match the rest of the panelling in the room which is being painted.
In the set of photos shown below you can see this process documented. The first few images show the forms used to curve the MDF and also to cradle it once curved on the CNC. The fourth image shows the MDF glued and in the vacuum bag to keep it in position overnight while the glue set. In the fifth image you can see the formed panel, which was sawn into three pieces. The cradle was then positioned onto the CNC and I machined out a precise curve to ensure everything would line up perfectly.
Each panel was screwed in place on the cradle and then the panel shape carved into it and the edges squared up. The finished parts can be seen in the last image, I also made a saw jig for these so they could be cut to length for installation. They have now been installed but I have not been able to get to the clients house yet to take a photo but will update when I can.


Last weekend we got away for the weekend to one of my favourite places in the UK; Fountains Abbey. Below you can see a photo of the ruin of the 12th century abbey - its location in a secluded valley is unusual for such a large building but just adds to the magic. Inside the ruin the light and shapes are amazing, we were particularly lucky to have a nice sunny autumn day to accent this as can be seen in the second image below. The last image is a carving that was on the wall in the more recent hall that was built near the ruin. It’s a very good carving, almost certainly Lime wood and in the style of Grinling Gibbons although not quite the same quality as the master, impressive nonetheless. Visiting places like this is one of the ways I get inspired and motivated to create my own work… If your in North Yorkshire its highly recommended.


The Moulding toolpath is a really good featured that was added to Vectric’s Aspire software about 2 years ago. It allows you to machine standard cross sections very efficiently. I’ve had need for it twice in the last two weeks. The first was to cut arched pieces of architrave to match the moulding being used, as seen in the first three pictures below. The second was to create a curved pieces of cornice to match another much deeper moulding (65mm). The process for both of these was to measure the original carefully using digital calipers, draw the profile in the software and then cut a 2D sample to compare to the original and make any small adjustments. Then you can literally extrude this shape to make a moulding toolpath to carve the shape. As you can see in the last photo you can get this pretty much perfect and they are also pretty efficient to cut too.


A while back I cut a prototype for a light cover for a client, they approved it but did not want all the parts cutting until the lights were ready for install. I got the go-ahead with these last week so went into production mode carving 10 of them at once - 2 sided. There was a bit of tear-out in the oak on a couple of them so I had to cut a couple more, adjusting the toolpath to minimise the chance for this to happen. These are waiting for final finish before install. The pictures below show them in process but not the complete set (I forgot to take a photo)…


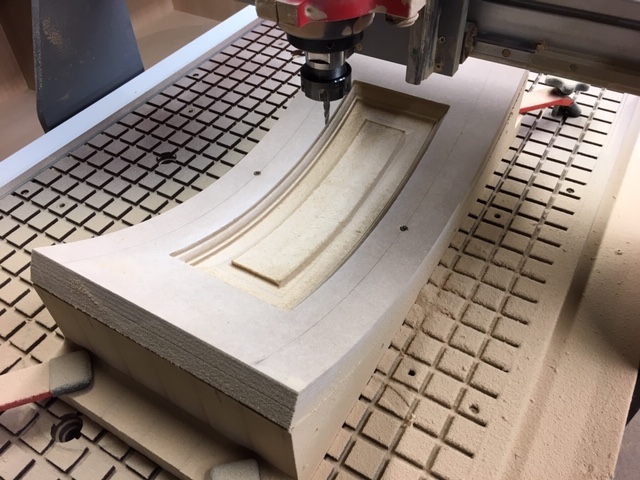
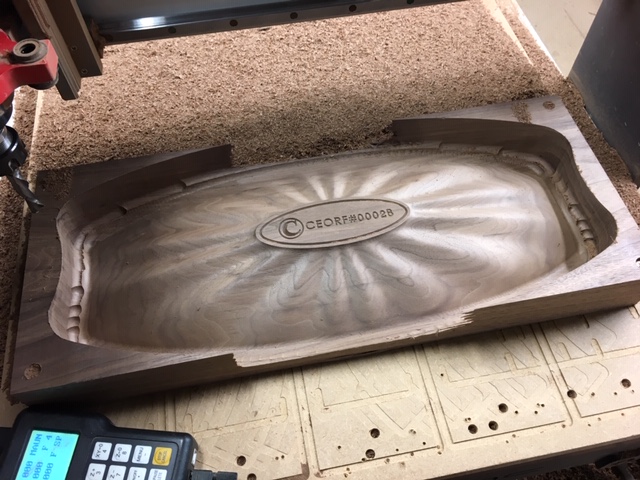
When I first started CeorfanWorks I made a bowl in Sapele with a rippled back. I really liked the design and had always intended to make a second version the original sits on the piano at home. A recent visitor saw the original and really liked it, he’s now commissioned me to make him one in Walnut. The thing I loved about the original was the rippled shape and how it interacts with the grain, the only problem is with it being on the underside its quite hidden - hence we have the original on the piano where its elevated. For this version I added some ripples to the top as well (although not as pronounced) which looks really good. Below you can see the process for cutting the bowl (two sided). This now needs sanding to eliminate all the tooling marks (although these are light I like to try and get rid of them all) and then I’ll oil it which should really make the grain pop.


Finally a few other quick jobs from the shop (it has been busy). I made some internal panels for a window frame I cut the parts for a few weeks ago (first image below). Another job was a couple of curved components which I don’t actually know the use of (I just draw them to spec and cut them…). The last image shows the result of my new branding iron I ordered which I can use to burn the logo into products rather than always carve it - the carving takes time and can be awkward to finish. I had a bit of trouble with heating it and making a good mark but with some practice I’m sure I’ll get good results.


