Planning and Christmas Gifts

It's been a lazy period over the last month with the holidays and some renovation projects which needed more attention than I spent on activity in the workshop. Thankfully this is all pretty much finished and so starting on Monday I'll be in the workshop full-time really for the first time since I started this project. That should mean a lot more productivity and focus - if pull my finger out it may even result in regular updates to the website...

As well as the normal Christmas period activities I have spent a lot of time thinking about what I want CeorfanWorks to be and started to do some more formal planning so I can create a path to follow and try and stick to it. The planning stage is always exciting as the potential is endless and the hurdles often small or invisible, it does not help much with my sleep though as my brain races thinking about ideas and directions to follow... I should have this nailed down in the next couple of weeks though and aim to document the plans as fully as possible on the website.

I was able to make a few things before Christmas which are shown below. Several people ordered a magnetic beer cap catcher - you can see in the first image the masking film having been carved through ready for painting - this mask worked really well and edges of the letters were perfect. The middle top picture is the ruler I made for my niece around October which is now installed on their wall and being used as a child measuring device. Its not the best picture but looks good on the wall as satisfying as an oversized wooden object. The third image is a family of CeorfanBirds that Tom who I share the workshop with ordered from me. These are the only two baby birds I plan to make so are a special 'family' group. 

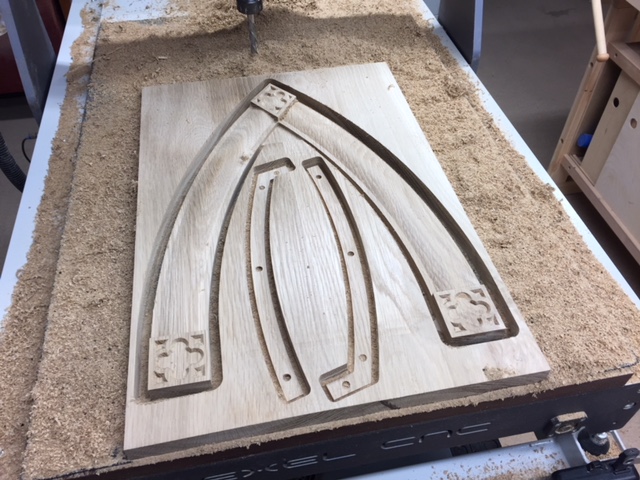
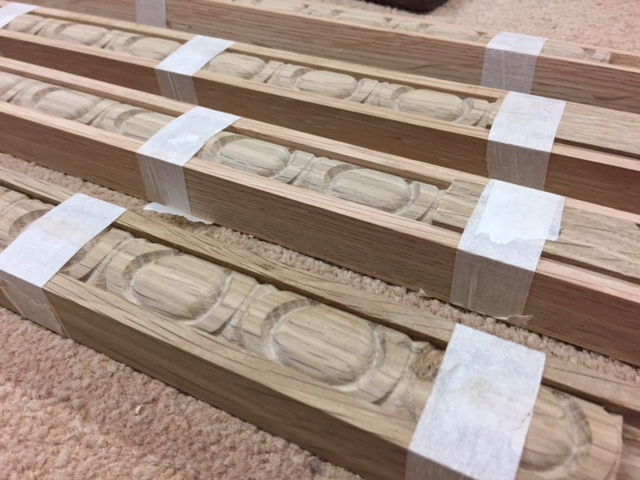
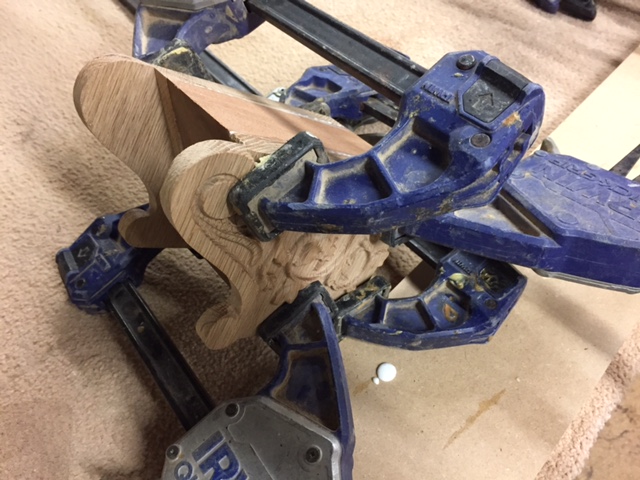
The second row of photos all show the present I was making that I alluded to in my last journal entry. These were for a pair of bookends for one of Tom's (the cabinet maker I share a space with) clients. They are based on a design for a stone gate drawn by the well known 16th/17th century British architect Inigo Jones. I took his design and based on that created the drawings using Vectric's Aspire software, I then used these to create the 3D models. The columns, doors, main part, tops and bases were all cut in separate pieces from oak using a very fine tapered tool. The machining time and cleanup on these very fine parts was quite lengthy but the finished pieces are quite striking and the multi-component assembly is very effective. The last photo shows then finished and in pride of place on the clients mantel.

Beer Cap Catchers, Architectural model and a task for the in-laws...

I've had quite a busy week in the workshop this week. Although I can only show some of the things I've been doing as I've got various Christmas gifts in the works which I don't want to spoil the surprise for (although the chances the recipients might be reading this are slim to none...)

Something I've previously made for myself and that I have been meaning to start prototyping for a while are beer cap catchers. These are wall-mounted openers for bottled beer that have neodymium magnets in the back of them so when the beer cap falls its caught by the invisible force of the magnet. So I cut a few design ideas this week some with inlays and some with painted detail as you can see below. the first few I made had a bit of bleeding of the paint despite the fact I was sealing them. This prompted me to order some signmakers sign vinyl mask. The combination of pre-sealing the wood and cutting through this means the finish for edge the paint will be much better and save time. I'll aim to document this process more in the future with some images. I was quite happy with the prototypes I made this week  but the next batch should be much better. I particularly like the ace of spades and the roundel but the others seemed to be a hit too with people I showed them to. I expect I'll be making a many of these next year as I know a lot of beer drinkers.

I also worked on what is effectively an architectural model this week. There are a couple of images of this below but I can't show too much as its destined to become something a bit more interesting. It is looking really nice though so I'm excited to show it when its finished. 

The last thing I can show this week is the laminate worktop that I cut for my in-laws. They had some installed in their kitchen but a mistake was made with an end piece so they needed a precise ellipse cuttings into it but this had to also blend into the edges. To add to the excitement the piece was 902mm so slightly to big to cut in a single operation on my CNC. My trusty jig for cutting oversize parts worked perfectly though and then I just very carefully measured between cuts. Thankfully there were not problems and the in-laws were happy with the result, which is a real achievement. 

Odds and ends, Cherub window and the Mantel is finished...

I've been a bit lazy in updating this blog for the last few weeks. Thankfully this has not meant an absence of activity in the workshop plus I've had a number of non-work related things going on to distract me. I'm looking forward to next year when I'm fully focused on making things and reduce external noise. Anyway, enough excuses...

I finished off the giant ruler I was making for my niece. It looked great she was very happy, next year I'll look to add these as a product (when I get organised to sell things). I still have to photograph it finished and installed but you can see it being sprayed with lacquer below. Next to that is an experiment I cut as a new sign for my house, I wanted to look at making a wooden house sign with a more modern look to it. I like the texture and layout but might need to think about altering the design for more easy finishing. Finally on the top row of photos is a simple plywood box I made to cover a fuse box. I had forgotten how pleasing it is to cut pieces that just slot together to make a perfect joint.

The next set of pictures shows a window that I'm collaborating on with the other guys in the workshop. I've designed the carved cherub and feathers to echo an old carving that is displayed in the room this is going into. The backside of the window is more simple with just the quatrefoils. Hopefully we'll get to assembling this and installing in the next week or two. 

Lastly the very ornate mantel that I've been writing about since July and working on for even longer is, I am pleased to say, finished and installed. The last 8 weeks have been spent intermittently working on building up all the pieces to make the main horizontal mantel block and the columns as finished assemblies. In addition, as the finished mantel also required doors we decided to accent these with the same egg and dart on the mantel. So I needed to cut some flat lengths of these to incorporate into the frame. You can see these below.

After some handwork to finish the carving and joints the main parts of the mantel were ready for spraying as you can see below. Then it was assembled and taken over to the customers to install. You can see it being lifted into place in the images. As is typically the case there was then quite a bit of adjustment to get it to fit straight and true into an uneven space. Thankfully the guys at Thomas Philpott cabinet makers who I share the workshop with took care of this which was fascinating to watch. Finally it slotted into place with the surrounding woodwork completed to blend it in with the already beautiful work that those guys have done in this room. The customer is very happy as am I and they'll be a lot more photos added to the Gallery soon, to document this very challenging but rewarding project. 

CeorfanBirds, a new flock, a rule, simple signs and the mantel takes shape...

I started the week by cutting another 16 CeorfanBirds. These will now be finished and then this will become my first ready-to-buy product. I have 26 cut and 10 finished with the first 13 being given away to people who have been influential in my life. The next 13 will be offered at a special price to commemorate their launch - more on that when they are available.

I also worked on finishing the large oak rule that will become a wall mounted measuring chart for my niece's children. This was sealed then the numbers and markings painted before it was finish sanded and a final coat of lacquer applied. I am really please with how nice an object this is and again will offer these for purchase at some future point. 

I also cut a couple of simple signs one for a customer of the guys I share the workshop with - which needed to be carefully positioned on a thin strip of wood. The other was a test to create a contemporary looking house sign with a textured border area. I used this also to show-off my CNC to some old work colleagues from Vectric who stopped by the workshop on Thursday to take a look at what I've been up to. Leading up to that I got the workshop better organised - moved my wood storage and with some help built a new workbench to hold some of the heavier tools. So at this point I'm really well setup for cutting and finishing all in the same area. 

At different times this week we've also continued the assembly of the ornate mantel. This is now in 3 pieces that make up the whole of the mantel assembly. Its been fantastic to finally see it come together and how well the whole thing has worked. Its really special to start with a pile of rough sawn timber and then several months later have transformed it to this.  All that is left  is some hand finishing to blend a few of the discrepancies together and tidy up some corners. Then it'll get sealed and a good overall sanding before finish lacquering. To complete the install we'll also need to make a backer for it to sit on and some doors to cover the none-operational fireplace that this is designed to surround. They'll be tied in with the design by having an egg and dart inlay that echoes the original. Overall though after such a long time we're getting close to installation...

The Mantel continues, more Cherubs and an Ale Taster...

Due to some unexpected work on a job that the guys I share the workshop with had to attend to this week, we only managed to find a single day to move the mantel assembly along. Although I did manage to find some time in the rest of of the week to do some hand-work on the corbels, capitals and main part of the column to blend the joints and tidy up the carvings. 

As you can see from the photos we continued to glue up the components for the top of the mantel and then measured this to ensure the sizes for the next section are correct. The main carvings were then glued up as a box, I'll hand finish the corners so the design wraps around next week. Then for the very top of the mantel we added a packing block to the main moulding to allow the egg and dart to be attached securely. The other piece of moulding that sits below the main carved panel was also glued so it can be mitred in a single operation.

Schedule permitting we should hopefully get to the final fit and assembly next week. Then we'll be looking at a bit more hand-carving and onto the finishing processes. It is really good to see the sub-assembled pieces coming together and getting a sense of just how complex a piece of work this is. 

During the other days I spent in the workshop this week I modelled a cherub panel which is a another test, continuing the work on the cherubs I completed last week. This weeks panel is based on a 17th or 18th century original. I was very happy with how this test cut and now I'll take them back to the client to compare against the original to make final changes to the model. Then we can decide exactly how he wants them to be used. 

I also delivered a simple ale-taster which you can see in the final picture below. This is designed to hold 6 x 1/3 pint glasses and has a Lazy-Susan mechanism underneath so it can be turned. The client wanted the pub logo engraved into the top and plans to do the same with the glasses so they match. 

To finish with on Friday I had a good tidy-up and re-organisation which is painful but necessary once-in-a-while. Next week I'll sort out the tools etc. and then hopefully won't need to do this again for a while...  

Mantel construction continued, a daft sign and cherub tests.

Another slightly abbreviated week in the workshop this week due to external commitments. Although we did make good progress Monday and Tuesday with starting construction proper of the ornate mantel - which has now been many months in gestation.

Last week we were able to start by gluing up the sides and centre of the corbels. Monday we glued the fronts into them with a small bit of veneer padding. The alignment was pretty good but I always knew there would be more hand-work required due to the angle that these different components need to be carved at on the CNC. At the end of the week I was able to spend some time cleaning up and blending one of them. You can see this on the left, in the picture below next to the one which is unfinished. 

Going back to the rest of the mantel, we decided to glue up the three components that make up the face and sides of the columns that will go on each side, before they would be mitred. The idea is that this will give a consistent mitre angle when they are assembled. Each column includes the base moulding, the carved vertical panels and then the capitals, you can see these laid out in the image below. Once the glue had a full day to dry the next job was to very carefully mitre cut each side and then glue them up. At this stage I was quite nervous as any mistake would have meant a lot of re-work. There was nothing to worry about though as the sawing went well, followed by a dry-fit and then gluing them up back-to-back for rigidity with corner clamps to pinch all the corners together. 

In amongst working on these we also started on the top as we realised that the rest of the mantel can effectively be built from this to get everything proportionately correct and to ensure we mitre things like the egg and dart in a sensible place. Things are pretty busy in the workshop so I'm not sure if will continue with the build this week or next now. Its been really nice to start to see it come together though and realise you've made everything the right size and depth. 

I've also been finishing up some other pieces this week, one of which is the "funny" coffee themed sign you can see below. In case your not aware Kopi Luwak is the coffee made from beans that civets eat then pass through their system only to have them harvested, cleaned and made into the worlds most expensive/ridiculous coffee. 

Finally I started work on modelling a cherub based on a existing carving a client wants me to copy. I made some test cuts which you can see in the final two photos below so I can take them and compare them to the original and make any final tweaks. They are both slightly different with the face on the left having had a bit more sculpting on the hair and cheeks. That's pretty much it for this week, its been great to see the mantel making progress and keep everything else bubbling along too. 

Mantel construction underway and an inlay experiment.

I only managed a few days in the workshop this week so not too much to report. There are a couple of ongoing projects on the bench which are gifts - so I can't post photos of those yet. They are both in the finishing stage where I am still trying to figure out my preferred method for applying paint to text. I made a few tests this week and each method has pro's and con's so no definitive progress - although I should probably stop using oak as a material for projects with text as the grain is a pain to work with. 

On Thursday we tentatively started the assembly process for the ornate mantel. This mainly involved cutting the carved components out of the stock material and thinking about how exactly it will all go together. You can see a shot below of nearly all the pieces that will go into the final mantel laid out on the bench before we started. A few of the detail carvings still needed cleaning up to remove some "fuzzies" and add a bit of definition in tight areas so I spent a couple of hours doing that. I also needed to cut some angular wedges to glue into the centre of the corbels which you can see below too. Now we've got our heads around the full extent of what needs doing we should make real progress next week in putting together the side columns and hopefully get to the large horizontal part. 

To finish the week I spent a bit of time tinkering with an idea for inlaying different woods into a decorative bowl. This was really an experiment as I was not exactly sure how it would go together or if it would work at all. In this case I created a simple bowl with a rounded octagonal outline. The main bowl to be cut in walnut with maple inlays echoing the bowls top profile. The inlay was pre-machined and glued in before the bowl was cut from the wood. I surfaced this so it was level again then I used my normal 2-sided technique to cut top and bottom. It was intriguing watching the inlays emerge out of the wood and the combination of light and dark chips being created was also an unusual site while it carved.  

The final result was mixed. As a proof of concept it worked well and from a design point of view the inlay looks very elegant and I like the way the octagon interacts with the sphere of the bowl. The biggest failure was the way the maple and walnut tore when the tool cut across the grain at the 12 O'clock and 6 O'clock sides. There are several reasons why I think this happened - such as not a tight enough fit for the inlay so a bad glue contact, cutting too fast, cutting across the grain, the shape of the bowl creating a point etc. As is always the case though I believe there are ways to combat all these so when time allows I'll cut another test when and look to account for the issues. Regardless I like how it looks so that is a plus and for every test you progress your knowledge...

A new flock of CeorfanBirds, a giant ruler and the Vectric User Group

I revisited my CeorfanBirds project this week and cut a small flock in Walnut wood -  which is what I'd always intended to make them from. This was a test to see how long it would take to machine and finish a reasonable number. I was able to fit 10 birds into the piece of material and was pleased with how they carved.  I've sanded most of them which is really nice as they are very tactile and next week they'll get some oil to really accentuate the grain. At some point in the future these will become an item for sale in a limited edition run. 

A completely different project is the giant ruler I cut this week which will be a high-end children's measuring chart.  As it's around 1800 mm (approx. 6 ft.) then I needed to do multiple setups on the machine to cut it but my trusty jig worked perfectly again to do this. The chamfered edges were not cut on the CNC but done on a spindle moulder by the guys in the workshop. Next week I'll be doing some tests to work out the best way to finish the letters to ensure nice neat edges and no bleed. 

Otherwise this week I did quite a bit of modeling and prep work on some future projects and made a couple of simple hook brackets for the AK-147 to mount in on the office wall. I am pretty sure now that the AK will remain just a prototype and talking point for now...

On Thursday I attended the Vectric UK User Group meeting. It was novel to be sat on the other side of the desk but I enjoyed the meeting, got a lot from seeing the new features of Aspire V9 demonstrated and as normal enjoyed chatting with other Vectric users and the guys who work there. The only downside of the day was I drank too much coffee and had too many ideas swimming round in my brain so slept terribly that night.