Carved Mantel Gallery

This oak mantelpiece was made in collaboration with Thomas Philpott Cabinet Makers. The brief was to create a design which was a replica of an existing 17th century mantel that the client already has in their house (shown in second photo - painted white). To make the project the original was extensively photographed and then computer models of all the carvings were created using the photographs for reference. The models were adjusted in size to allow the mantel to fit into the available space before carving on the CNC machine ready for finish and assembly. The installed dimensions of the mantel are: 1405mm x 1250mm x 250mm. 

In the first block of images below you can see completed pictures of the mantel. In the second block are images of some of the build process. 

Finished Installed Mantel

Build Photos

Walnut Leaf Clusters, Frames and Key Holders

Work continued on the many parts needed for the Gothic Kitchen this week. I made 30 Walnut 3-leaf clusters which will go on the door panels, you can see these being made in the first three pictures below. I also made a shaped sanding block to help sanding the quilted panels. You can see this in pictures 4 and 5 below. The guys in the workshop have also glued up the wood for the 10 oak posts in the kitchen. So I'll start the process of pocketing those next week so we can glue in the quilted panels and pyramids - they are 2 metres long so will be a good challenge.  

The last picture on the second row below is one of two ceiling-window frames which are going in the library that the guys worked on last year. I cut quatrefoils and chamfered pockets in this to match the decoration in the rest of the room. I also cut the pocketed section in the side which will hold the blind. 

Finally as a one-day project I made a prototype for a magnetic key-holder. This maple block has magnets in the back much like the beer cap catchers I make. The idea is you fix it to the wall and then can just "stick" your keys to it when you come in and pick them off when you go out. It also looks nice as a piece of wall art with the smooth ripple carved into the front. I maxxed out on the magnets so this one works particularly well... I'll aim to finish it on the weekend and put it up so I can photograph it in action. 

Quilted Panels, Pyramids, Old Projects and Nonagon Bowls

The start of this week saw me in production mode with the Gothic Kitchen. I started by cutting the quilted panels that will inlay into all the vertical posts in the kitchen. These are carved in walnut wood using a pointed round-over tool, making simple 2D straight line passes. As I needed to cut 30 of them I spent quite a bit of time perfecting speeds, feeds and cutting direction to get the cleanest finished part I could (you can see a close up in picture 1 below). To minimise material waste I made my own wooden stepped piece to help clamp the ends of the boards (picture 2). The other parts I've been cutting for the kitchen are some small square shallow pyramids that you can see in picture 3 - these will also inlay into the posts. 

A couple of projects I worked on a long time ago were picked up by the guys I share the workshop with this week for the final finishing work. In picture 4 you can see the frame I designed and made with the vinyl disks placed within it. You can see where I got the reference for the eye that is carved in them now from the image on the disks. This is 95% done and just needs some felt to cushion the disk and then final assembly. In pictures 5 and 6 you can see the Cherub window frame I carved at the end of last year. Adam did a brilliant job with making the window so it will be able to be rotated about its centre as you can see in the image as well as making sure the carving lined up with the outer frame... This was quite a challenge due to the thickness of the carving. This is being stained this afternoon and I'm hopeful it should be installed next week. 

Lastly I continued my bowl experiments using a scrap block of Sapele I had left over from the greenhouse window frame parts. I wanted to look at the affect of using different types of cut on the same shape. So I created a basic nonagon shaped bowl on the computer and then carved one with a straight tool as a stepped finish, one with a round tool doing the same and then finally a "normal" smooth version with a typical finish pass. In the last row of pictures you can see the result of these. They are all appealing and interesting in different ways and all present different challenges with sanding and finishing. I think my favourite is the one with the round-tool stepping which is in the middle of the three shown in the images below. I'll probably now cut some more variations based on this idea adjusting spacing, tool size etc. 

Next week hopefully I;ll be continuing work on parts for the Gothic Kitchen and hopefully have time to fit in some more bowl experiments. I'm also starting the computer work for a piece of art examining the idea of belief. That will be a number of weeks work to complete though...

Wooden Bowls cont. & Quatrefoils

This week there was a mix of things on the go, I cut another iteration for my organically shaped wooden bowl series, I did quite a bit of sanding and oiling of parts I'd already cut (then finally I spent Thursday cutting Quatrefoils for the Gothic Kitchen project. 

The first two pictures below show a bit of a disaster I had on Monday while gluing the top of the bowl I made last week to its base. This was one of those situations I could see happening as I was doing it but still did nothing about until it was too late... you live and learn... or maybe you don't. Its been glued back together as well as I could with something so hard to clamp. I'll now oil it and still gold leaf the edge and maybe also gold leaf to highlight the repair as is the Japanese custom when fixing things. We'll see how it looks when done. At worst another useful experiment. 

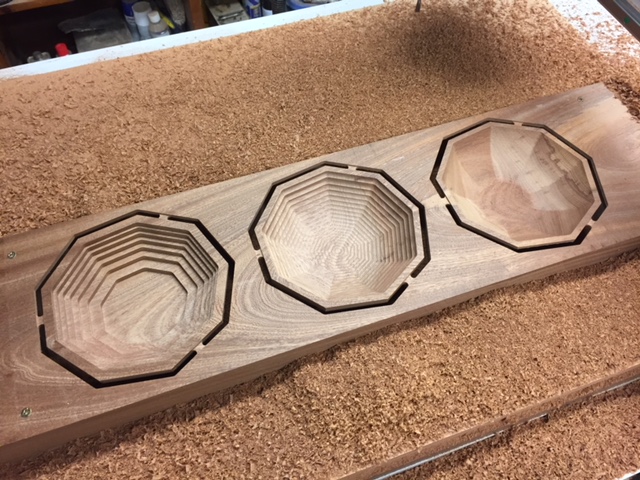
The last picture on the top row and the next three show a new bowl that I made which follows on from the one I cut last week. This incorporates distinct "legs" that blend into the organic surface. I really like how this has turned out and feel I'll make a lot of variations on this theme to create a collection that I can start to show to galleries or offer online. These look and feel amazing and I think once its oiled the grain and curvature will really show well. The part-sanded finish that leaves some machining marks in the part just adds to the texture and feel. 

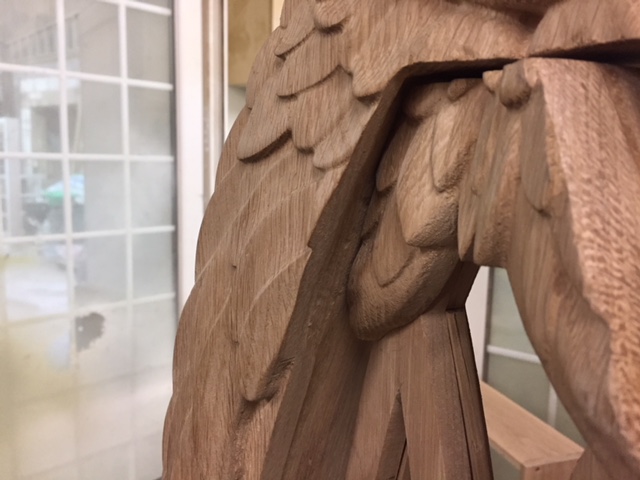
The first picture on the last row is an extra project I've been playing with this week. When our client for the Gothic Kitchen came into the workshop a couple of weeks ago I cut a walnut poppy to demonstrate the CNC cutting. I thought I would the result of this and make an ash plaque that this could be inlayed into.  Then I thought it might also be good to have a go at hand-undercutting this so put a good few hours in with the chisels and dremel to cut behind the petals and add a texture to the surface. I was pleased with the result although it is time consuming - this shows it before finish. 

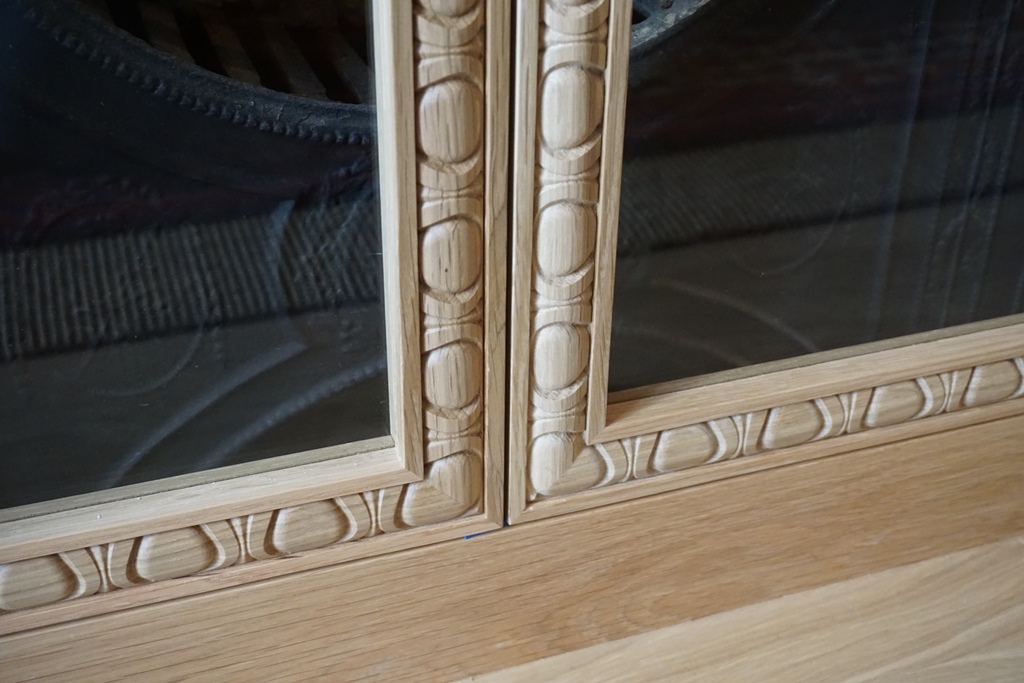
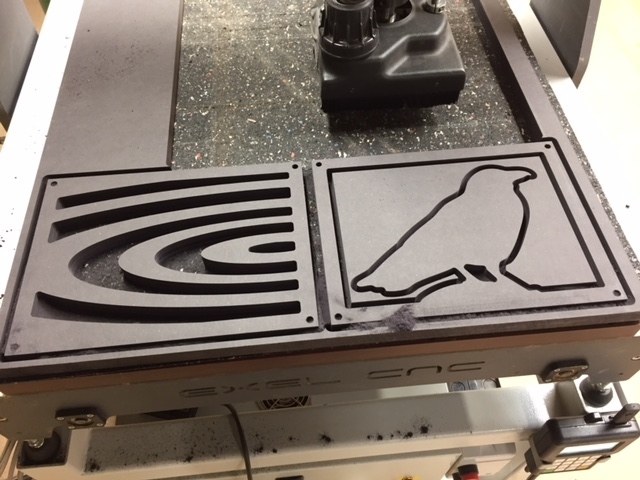
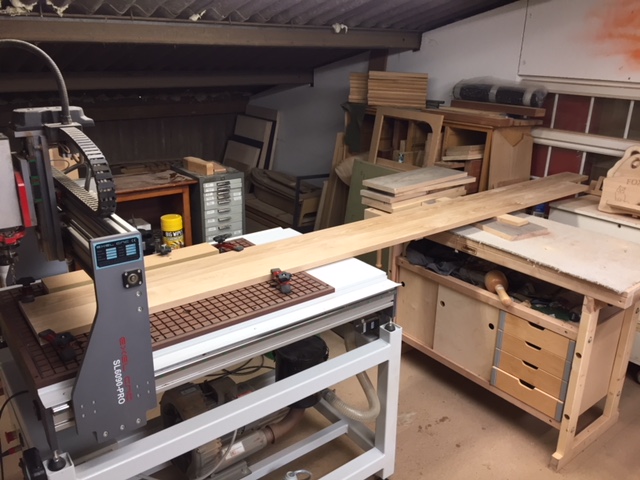
The last two image shows the rows of oak Quatrefoils that will run along the top of most of the cabinets in the Gothic Kitchen.  Most of them I was able to cut in a single setup but the slightly longer one is shown on the CNC indexed to cut the full length. Each part took four tool changes to cut but they look great - particularly with the convex shape on the inside. For fun I shot a  quick stop-motion video of a length being cut, you can watch the low-res video here.

Next week I expect to be making a lot more Gothic Kitchen parts... and thinking about how to start selling a few of the more product-type things I've been making.

Wooden Bowls & Finishing

Interesting developmental week in the workshop this week. I was expecting to get started with the Gothic Kitchen project but did not really think through the logistics of planning and ordering material for such a large endeavour, so that'll probably be next week now. That did give me the opportunity to spend a  bit of time finishing things while I also experimented with one of my personal obsessions - wooden bowls. 

I find making wooden bowls fascinating. The chances that it would have been one of the earliest things humans would have fashioned - way before the "stone-age" there would have been the "wood-age" there are just very few surviving artefacts to study so its mostly overlooked historically. While traditional hand carved bowls often are very beautiful and of course there is the ubiquitous turned bowl (many of which are very nice) - the utility and tradition of these tend to dictate their design. To me that means there is a huge area of ideas to explore with what a bowl can be in terms of shape and interpretation. I find myself coming back it to again and again in my sketchbook. Each bowl I make informs me and while helping coalesce my ideas of the next iteration it often opens up new pathways for other ideas too.

This week I started making two radically different looking bowls - although both from the same walnut board. The one you can see in the first six pictures below emulates some shapes I really like from oriental ceramics. The main body was cut 2-sided from a 60mm thick piece of walnut wood. In addition I cut the base from the same material. I've machined a v-grooved line highlighting the rim which I plan to gold-leaf and the base has a cavity to put some lead-shot to provide it with a bit more heft. This is really quite a formal design and I am looking for a fine surface finish (lots of sanding and scraping). 

The second bowl is a more left-field approach to what a wooden bowl can be. I made what I would think of as the first iteration of this idea when I was working at Vectric. At the time I always planned to revisit and develop this further although that was over 2 years ago - better late than never. The shape emulates the form of material blowing in the wind, it's really sinewy and incredibly tactile and marries with wood-grain to create something I think is incredibly beautiful. I was pleased with this next iteration ( images 7-10 below) and learned a lot from it, its not quite there in terms of what I'm looking for yet though. One thing I did try with this is to minimise the hand-finishing and embrace the machining lines as part of the process and aesthetic of the flow of the design. This will of course save time and so make them considerably more affordable. After one coat of oil I'm cautiously optimistic this approach may work. Lots more ideas to come with both bowl designs and many others over the coming months and year. 

While making bowls I have also been finishing another batch of CeorfanBirds, the Ace of Spades beer catcher (shown below complete) and a small project with the some hand-undercutting for a memorial poppy. (last picture below). So its been a useful week of chipping along a number of things. Next I need to try and bring some of these things together and look for ways to make these things available to purchase. I need to start with a bit of a re-format for the website first though...

Ace of Spades, CeorfanBirds & Silhouette Art Experiments

This week is the calm before the storm of serious work starts on the Gothic Kitchen project. As such I took the time to get organised in the workshop and spend a few days working on some more production-type projects. The first of these was an "Ace of Spades" magnetic beer cap catcher. I decided to use some some walnut and ash left from other projects to produce a set of 8 inlayed bottle openers. For these I used a slightly modified V-inlay process to make the spades. I also decided to put the grain direction at 90 degrees to really accent the inlay. This has worked really well (although is harder to sand cleanly), now they just need a final coat of oil on Monday then the actual openers attaching. I plan to put these on sale in the next week or two to see if there is any interest...

In a similar vein I also cut a new batch of 10 CeorfanBirds as can be seen in the third row of images. These are waiting to be sanded and finished then I'll take them round some local galleries and maybe also look for an online outlet to sell them. 

The final picture on the third row shows the gothic kitchen door prototype I made last week with the rails and stiles added to it and the beading in the centre of the top arch. This looks really nice and we're meeting the customer this weekend to discuss the initial models and to start work on the full set of parts. 

Finally this morning I had a couple of hours in the workshop so for my Friday project I made a couple of quick silhouette art experiments using ellipses for one design and a raven outline for the other. I now need to develop more designs, test some finishes and think about installation hardware before I can also start to sell these on the web as well. 

All in all a productive week and I finally feel I'm starting to get into a rhythm although still need to get more efficient with my scheduling to get the most out of my time (and Igor the CNC...)

Gothic Kitchen Protoypes and Beer Cap Catchers

This week I've picked up the Gothic Kitchen project again - this will require a lot of carving over the next couple of months but at the moment I'm making various prototype pieces to test a variety of things before we get into production. We need to confirm the depth of parts, allowances for fit of joints and inlays, cutting speeds for good finish etc. In the first six pictures below you can see the various parts I've been making to check all these parameters.

The three-leaf motif will be used on the drawer fronts in three's then also echoed on the door panels in partnership with some shapes moulding.  At this stage we're not sure if the whole kitchen will be oak or also include some walnut accents, hence the selection of materials I've been cutting. The columns on the kitchen will have a low pyramid shape and a quilted section inlay as you can see in the second row of photos. Working on these has started to answer a lot of questions but there is more to look at next week before we start making in earnest. 

Wednesday I was asked to make a couple more beer cap catchers for some birthday gifts. I decided to use my old design but change the painted area to be a walnut v-inlay instead. I also used Ash wood for the main shape instead of oak and really like the way the grain looks in comparison with the inlay. The photo shows the two I made waiting for another coat of oil.

Finally the last two pictures show a few projects I made for our holiday cottage that I've discussed before such as the black wall art, the shelves, a ceorfanbird and a dish). In addition the "Make Good Art" sign got a coat of oil which makes the letters stand out more clearly as you can see in the last image. To finish the week I had a good clean in the workshop and greased Igor (the CNC) to maximise the chances of a productive Monday morning...

Print Stamps and Long Wine Rack

Had a good week getting re-organised and planning workshop activity for the next couple of months. This did not result in much actual making but did create the probably imaginary feeling of focus... I did manage to get one partial day in the workshop. The main purpose of this was to produce some stamps for the logo for our holiday cottage. These will be used to personalise labels, notes, stationary etc. These are just a simple flat-bottom v-carve (60 degree v-bit) cut into MDF which is not exactly the best material for this application but works well enough and was cheap, quick to access and easy to cut. I ended up making two sets as I forgot to reverse the image on the first set (doh!).

While I was in the workshop Tom asked me if I could cut some holes for a long wine rack he needed for a job they are currently working on. The main problem with this is the part was almost 3m (12 feet) long and my machine is only 900mm (3 feet) long. This would have been straight forward as a pull-through job but I didn't have enough in-feed and out-feed space to fit the piece of material. So four of us picked up Igor the CNC, rotated him 90 degrees and then I re-levelled the legs. Now there was enough room and the cuts were fairly straight-forward. I machined 10 holes them moved the material through 600mm and cut the next 10 - repeating this 4 times in total. Everything came out well and I think I'll leave the CNC in this orientation as there is better access. 

Next week should be back to a full-time effort again, although I that seems to never last long at the moment so I won't get too excited until I managed a month of proper focus and productivity.